Extending Tool Menus in the Editor via C++
Unreal Engine has introduced a new way of authoring editor menus with version 5.0 (I believe). ‘Menu’ here is the umbrella term for different kinds of editor UI; toolbars, context action menus, and so on. The engine module is called, appropriately, ‘ToolMenus’.
Any menu in the engine that makes use of this API is identified via name. This way, you can access any of these menus from C++, as long as you know their identifiers. This article explains the general workflow, contains some example code and features some tips & tricks.
In this tutorial you will learn how to extend essentially any editor menu in the engine.
Results: Lock & Unlock Export menu extension for all assets
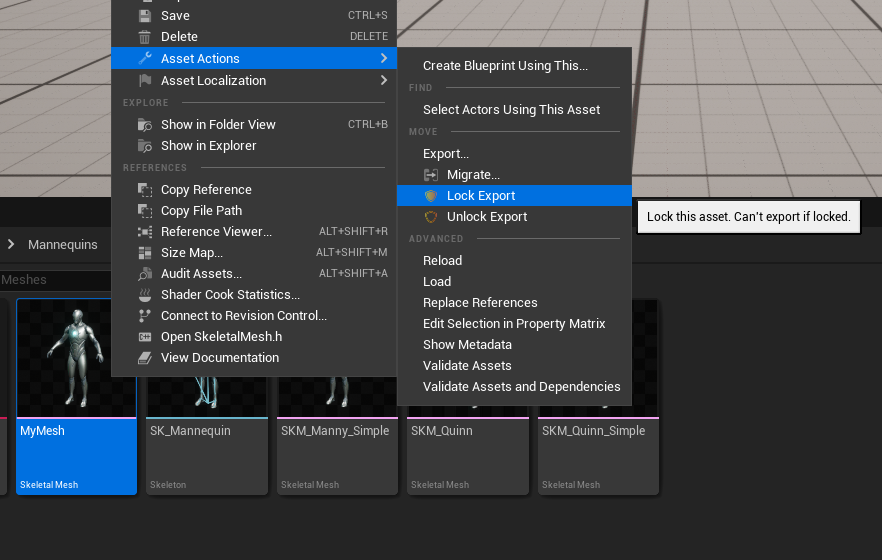
In this example, we have extended the general content browser asset context menu (that’s a handful!) to include two new buttons: Lock Export & Unlock Export menu entries. These menu entries lock, or unlock, the availability of the ‘Export…’ action just a few entries above; it does not modify the actual export logic, just hides or shows the Export menu entry.
Download
To download the actual plugin which serves as an example, or if you have been looking for this functionality specifically, download the plugin for Unreal Engine 5.3, precompiled for Win64.
↧ Download: host the plugin (e.g. YggdraShield.rar) via GitHub Releases and link it here.
How to find the menu identifier
To start extending a menu in the engine, you first have to find its identifying name.
Apart from just browsing the source code to find the menu names you are looking for, the Tool Menus module features a neat console command that makes things easy.
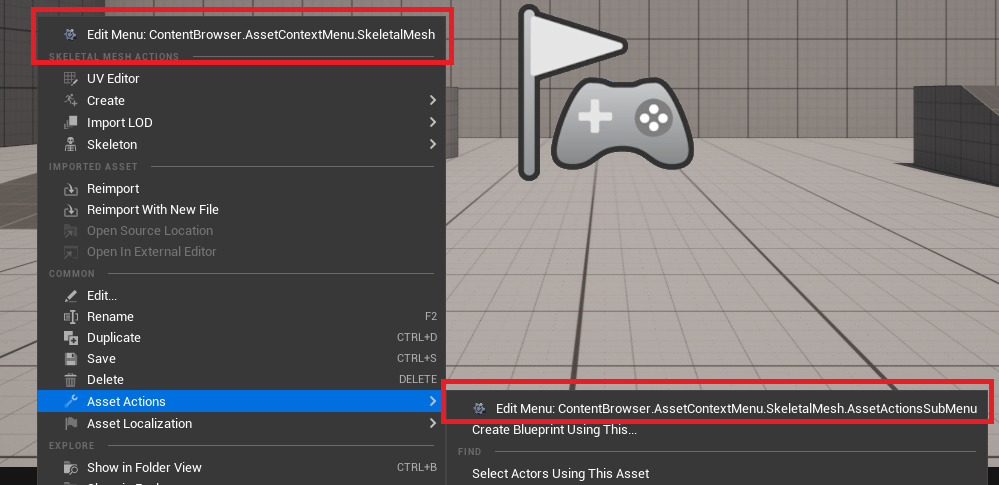
Activating the console command, ToolMenus.Edit, will display an ‘Edit’ button for any menu that was constructed this way. Clicking on one of these edit buttons will bring up a window containing useful information about a given menu, as well as let you edit menu entry order and entry visibility.


Extending the Asset Context Menu
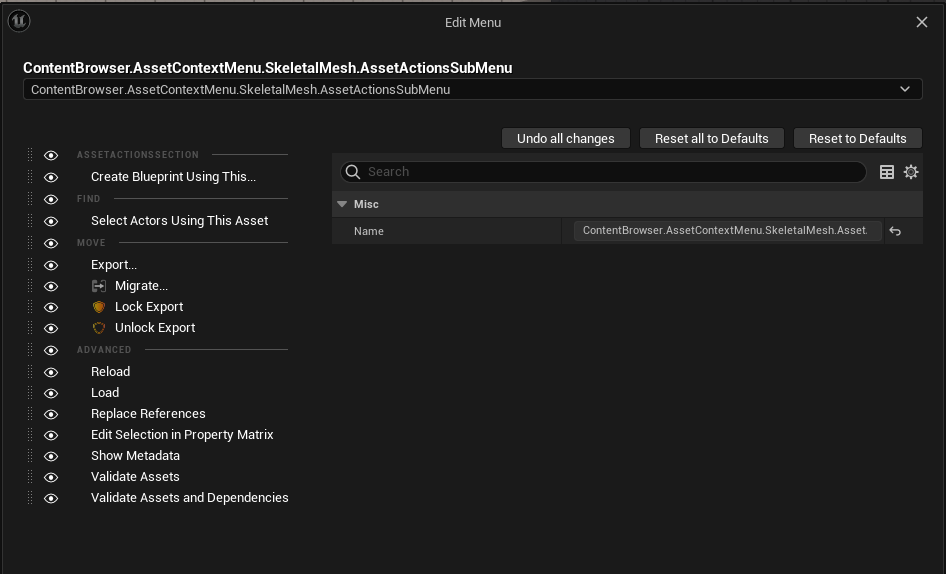
In this case, we are clicking on the asset context sub-menu’s edit button we want to modify. As you can likely tell, the name of this menu is ContentBrowser.AssetContextMenu.SkeletalMesh.AssetActionsSubMenu. This menu is specifically the menu for skeletal meshes; however, clicking on the drop down will bring up the menu hierarchy, as this menu consists of multiple parts; the ‘base’ menu for all asset context menus, the skeletal mesh specific additions, sub menus and so on.
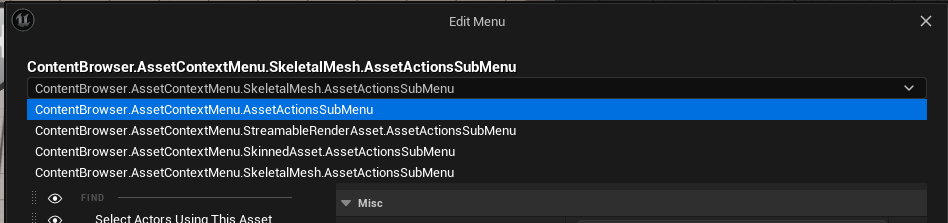
Here, the identifier for the menu we want to extend is ContentBrowser.AssetContextMenu.AssetActionsSubMenu.
The Code
This article is assuming that you have general knowledge of C++, as well as modules and plugins in Unreal.
The Hook
To register a menu extension, or a new menu in general, we need a place in code to do this. You can do this from effectively anywhere, but the easiest and most straightforward hook would be your editor module’s StartupModule function.
void FMyModule::StartupModule()
{
    UToolMenus::RegisterStartupCallback(
        FSimpleMulticastDelegate::FDelegate::CreateRaw(this, &FMyModule::RegisterMenus));
}
In the code above, we are making sure we are calling our own RegisterMenus function via delegate; the UToolMenus class offers a static function to ensure that our menu registering is only happening when things are ready behind the scenes.
RegisterMenus
(Tip: Click on ‘Extern’ to get a look with better formatting)
UToolMenu* Menu = UToolMenus::Get()->ExtendMenu("ContentBrowser.AssetContextMenu.AssetActionsSubMenu");
FToolMenuSection& Section = Menu->FindOrAddSection("AssetContextMoveActions");
FToolMenuEntry& Entry = Section.AddDynamicEntry("AssetManagerEditorViewCommands", FNewToolMenuSectionDelegate::CreateLambda([](FToolMenuSection& InSection)
{
    UContentBrowserAssetContextMenuContext* Context = InSection.FindContext<UContentBrowserAssetContextMenuContext>();
    if (Context)
    {
        FToolUIActionChoice LockAction(FExecuteAction::CreateLambda([Context]()
        {
            FAssetRegistryModule& AssetRegistryModule = FModuleManager::Get().LoadModuleChecked<FAssetRegistryModule>("AssetRegistry");

            for(FAssetData SelectedAsset : Context->SelectedAssets)
            {
                if(SelectedAsset.GetPackage()->HasAnyPackageFlags(PKG_DisallowExport) == false)
                {
                    SelectedAsset.GetPackage()->MarkPackageDirty();
                    SelectedAsset.GetPackage()->SetPackageFlags(PKG_DisallowExport);
                    AssetRegistryModule.Get().AssetFullyUpdateTags(SelectedAsset.GetAsset());
                }
            }
        }));

        InSection.AddEntry(FToolMenuEntry::InitMenuEntry(FName("Lock"), FText::FromString("Lock Export"), FText::FromString("Lock this asset. Can't export if locked."), FSlateIcon(FMyStyle::Get().GetStyleSetName(), "MyIconName"), LockAction));
    }
}));
First, we are calling ExtendMenu with the identifier we have found; this gives us the menu we want to modify. Next, we need to identify the Section we want to add our items to, or we can add our own. In this case, the ‘Move’ section seen in the actual menu has the identifier AssetContextMoveActions. This section contains the Export menu entry, and we want to add our own entry in the same section.
Now that we have our section, we call one of multiple functions to add new entries. In this case, we are calling AddDynamicEntry. A dynamic entry allows you to register a callback to dynamically determine whether to add an entry or not. This callback is executed every time the menu is opened.
The first step in the callback itself is retrieving a Context Object. Context objects are objects associated with the section or menu you are looking at. The assumption is that asset context action menus have a UContentBrowserAssetContextMenuContext context, but you are responsible for retrieving it. This object has data such as all currently selected assets, or a common base class of the selected assets.
A list of different context objects for the content browser can be found in the ContentBrowserMenuContexts.h file. For the content browser menus, these contexts are available for folders, assets, filter lists and so on.
After having retrieved the context object, we define an Action. This action is what we want to execute when clicking our new menu entry. In the last line, we add the actual menu entry: we give it a name, a tooltip, an icon potentially, and finally map the previously created Action to it.
And we are done! Now every single asset should have this action available.